Every Week It's Wibbley-Wobbley Timey-Wimey Pookie-Reviewery...
Showing posts with label Basic Dungeons and Dragons. Show all posts

Friday, 25 April 2025

Sample Dungeon Redux II

At its heart, the Old School Renaissance is about emulating the style of play of Dungeons & Dragons from forty and more years ago, and about exploring the history of Dungeons & Dragons, so it is always fascinating to see what its adherents will find after ferreting around in the archives. Beneath the Ruined Wizard’s Tower is a perfect example of something surprisingly brought back to the attention of the Dungeons & Dragons-playing audience. Beneath the Ruined Wizard’s Tower is not wholly new, but an extension of an old dungeon, that of the ‘Sample Dungeon’ which originally appeared in the Dungeons & Dragons Basic Set, published in 1977, and edited by the late Doctor J. Eric Holmes. What Doctor Holmes did was edit earlier example rooms and develop them into a coherent dungeon design, a ‘starter dungeon’ complete with backstory, context, and reasons for the Player Characters to venture into its depths. The ‘Sample Dungeon’ itself has previously been visited and expanded upon with The Ruined Tower of Zenopus. That though, brought it up to date with the modern incarnation of the rules, having been written for use with Dungeons & Dragons, Fifth Edition, Basic Rules, which are free to download from the Wizards of the Coast website. This means that it is also compatible with, and could be upgraded to, Dungeons & Dragons, Fifth Edition, and of course, with some effort, could easily be adapted to the retroclone of the Game Master’s choice. Beneath the Ruined Wizard’s Tower is not written for use with Dungeons & Dragons, Fifth Edition though, but instead for use with BLUEHOME: Fantasy Roleplaying Game, the retroclone designed to emulate the version of Basic Dungeons & Dragons written by Doctor J. Eric Holmes.

Beneath the Ruined Wizard’s Tower is a dungeon level designed for a party of Second Level Player Characters, who should, by the end of it be close to, or have reached Third Level. It is designed to be slipped in under the ‘Sample Dungeon’, expanding it physically, whilst also expanding the story strands and possibilities from the nearby town, Portown. There are essentially three of these and they are built into the design of the dungeon level if not into the town itself—that task is left up to the Dungeon Master to design and develop. These threads consists of a band of smugglers operating out of some caves who find themselves under the sway of, and giving tribute to, an Undead Corsair, now a Wight, who wants to be reunited with his wife, Lemunda the Lovely, who might be alive elsewhere; a Temple of the Rat God, where members of a secret society in Portown, come to worship in the hope of becoming a wererat; and a Pre-Human City, or at least, a very small part of it. What is present here is a very tiny part of that city, the suggestion being that Zenopus, the wizard whose disappearance is never explained in the ‘Sample Dungeon’, came here to study the city and might be somewhere in the city still. There are certainly signs of his activity in that area of the dungeon, including a wizard’s laboratory full of old alchemical experiments and an exhibit room with various trophies mounted on the walls.

This gives the dungeon three areas which are distinct in terms of flavour and feel. ‘The Haunted Sea Caves’ is where the smugglers hide their contraband and try to avoid the brine zombies that lurk here. They are damp and salt-stained. ‘The Temple of the Rat God’ is smoky, candlelit, and ridden with rat droppings, whilst ‘The Pre-human City’ hints at what lies beyond the limits of the ‘Sample Dungeon’. It replicates the Bronze Mask from the ‘Sample Dungeon’, that the Player Characters can also ask questions of, and if the players and their characters can solve a mathematical puzzle here, they can gain the means to activate ‘The Crystal Portal’, the means to travel back and forth across the dungeon and even possibly, into the city below… (It has to be said, that this mathematical puzzle relies on player knowledge, so is not something that the character might know.) Between all three and connecting them is ‘The Crystal Labyrinth’, a maze of caves in which it is all too easy to get lost in, be blinded if some casts a Light spell, and oddly, not feel the need to eat or drink.

There are some nice moments in the dungeon, such as when facing the Rat God cultists, not all of them being devout enough to want to fight anyone, let alone the Player Characters, and a prisoner, being kept drunk on brandy and cake, refusing to believe that she is being fattened for sacrifice! The dungeon even has its ‘Dungeon Constable’, appointed to patrol the dungeon—or at least the easily accessible parts—and prevent unauthorised adventurers just coming and going. Which lends itself to the suggestion that adventurers or others have been entering the dungeons and the town wants to regulate their comings and goings, though this aspect is never really developed.

However, the touches of inspiration like this are not quite good enough to get over the problems that Beneath the Ruined Wizard’s Tower has in terms of presentation. To begin with, the scenario’s three different areas and their associated plots could have better explained up front rather than Dungeon Master ‘Read to find out’ and there is a flatness to the writing that leaves the Dungeon Master with a lot of effort needed to bring it to life a bit more than it does. The map does not help in this manner. Whilst clear and simple, there is not a lot of detail to it, the inclusion of which might have helped the Dungeon Master portray the various rooms and their environments. The main problem though, is trying to find particular locations. This is because, in keeping with the keying of the ‘Sample Dungeon’, every location is lettered rather than numbered. The selected font is not easy to read and further, every empty room is marked with a ‘E’ for empty, so looking for the right letter and the right room quickly becomes a challenge. There are fourteen rooms just marked ‘E’ and thus not only clutter up the dungeon, but not really add anything to it.

Physically, Beneath the Ruined Wizard’s Tower is a plain affair. The map is decent, though not marked in an easy-to-read fashion.

Ultimately, is Beneath the Ruined Wizard’s Tower, as written, a worthy sequel or addition to the ‘Sample Dungeon’? The answer would have to be a no, which is a shame as there is both some nice details in Beneath the Ruined Wizard’s Tower and scope for a solid adventure within its pages. That though, will need some extra effort upon the part of the Dungeon Master to both fit it into her campaign and lift it out of the ordinary.

—oOo—

With thanks to James Fullard.

Monday, 26 December 2022

[Fanzine Focus XXX] The What on the Border Where?

On the tail of the Old School Renaissance has come another movement—the rise of the fanzine. Although the fanzine—a nonprofessional and nonofficial publication produced by fans of a particular cultural phenomenon, got its start in Science Fiction fandom, in the gaming hobby it first started with
Chess and Diplomacy fanzines before finding fertile ground in the roleplaying hobby in the 1970s. Here these amateurish publications allowed the hobby a public space for two things. First, they were somewhere that the hobby could voice opinions and ideas that lay outside those of a game’s publisher. Second, in the Golden Age of roleplaying when the Dungeon Masters were expected to create their own settings and adventures, they also provided a rough and ready source of support for the game of your choice. Many also served as vehicles for the fanzine editor’s house campaign and thus they showed another DM and group played said game. This would often change over time if a fanzine accepted submissions. Initially, fanzines were primarily dedicated to the big three RPGs of the 1970s—Dungeons & Dragons, RuneQuest, and Traveller—but fanzines have appeared dedicated to other RPGs since, some of which helped keep a game popular in the face of no official support.

Since 2008 with the publication of Fight On #1, the Old School Renaissance has had its own fanzines. The advantage of the Old School Renaissance is that the various Retroclones draw from the same source and thus one Dungeons & Dragons-style RPG is compatible with another. This means that the contents of one fanzine will be compatible with the Retroclone that you already run and play even if not specifically written for it. Labyrinth Lord and Lamentations of the Flame Princess Weird Fantasy Roleplay have proved to be popular choices to base fanzines around, as has Swords & Wizardry. Not every fanzine is dedicated to particular roleplaying games.

The What on the Border Where? is quite possibly the oddest fanzine possible and either the weirdest or most basic treatment of B2, Keep on the Borderlands possible—if not both. What it is not, as written, is a gameable product. None of the constituent parts of the module appear in the fanzine. Not the Keep on the Borderlands itself, not the Caves of Chaos, not the river or the wilderness. None of it. So if it is not a new treatment of the classic Basic Dungeons & Dragons module that so many of entered into the hobby by playing, then what exactly is The What on the Border Where?

The What on the Border Where? is really two things. First, it is an exercise in memory, and second, via that exercise in memory, it is a way of revisiting old modules and making them playable again. The result is a tool for the Dungeon Master that she can use to create new adventures out of old ones, a way of combining the solo play of journaling with the preparation the Dungeon Master has to do in order to ready a scenario. The example used throughout The What on the Borde Where? is based on B2, Keep on the Borderlands, since it is already familiar to so may Dungeon Masters. Hence the name. However, the process can be applied to other adventures too.

So what does The What on the Border Where? involve? It starts by suggesting two exercises. First, going to the kitchen, opening the cutlery draw and memorising what is in there. Then closing the draw and listing everything in the draw. The second is get both the prospective Dungeon Master of The What on the Border Where? and a friend to think about a film, quickly write its plot on a sheet of paper, and then compare notes. When both done, compare the list with the cutlery draw in the first case and the friend’s description of the plot and yours with each other’s, and also with the actual plot. There will be differences, and the comparison is not correct them, but to highlight them, to see what that is new and how that is interesting. Once those exercises are complete, The What on the Border Where? asks the Dungeon Master to do exactly the same with B2, Keep on the Borderlands. Look at the map of the wilderness in the module which surrounds the Keep and the Caves of Chaos. Do that for two minutes. Then put B2, Keep on the Borderlands aside and draw the map from memory. Then do it again for the Keep. And again, for the Caves of Chaos.

Once done compare the maps and begin to populate them. If the same, use the original entries for the locations. If different, then create something new, whether using wandering monster tables and taking something from other sources. However, The What on the Border Where? does have monster tables of its own, this its only actual gaming content. Then play. Options included in The What on the Border Where? suggest ways in which the Dungeon Master can turn the process from a solo process into a collaborative one with tasks being swapped round from the Wilderness to the Keep to the Caves of Chaos, and so on, so that none of the players are fully aware of what the created adventure contains.

Physically, The What on the Border Where? is cleanly and tidily presented. Much of it consists of plain map pages with notes on how to draw the maps from memory and the appropriate map symbols as you would expect for a Basic Dungeons & Dragons module from TSR, Inc.

The The What on the Border Where? never explores the obvious issue between the playthrough of the original module and the playthrough of what is a simulacrum of the original module. Just how far does the new memory-based simulacrum of the module have to deviate from the original before it is no longer what was played? How many exercises does the Dungeon Master have to conduct on new simulacra after the first, before what she is left with is not really based on her memories at all and almost exactly unlike B2, Keep on the Borderlands?

The What on the Border Where? is about nostalgia, a big feature of the Old School Renaissance. Essentially, it is not replaying the adventure that you first played forty years ago, but about recreating your memories of it and what you think you played, and playing that. It is also playing with and upon our memories of doing so, but in a way that leads to the creation of something potentially different, whether because our memories are wrong or we have forgotten things about the module. Ultimately, it is telling the Dungeon Master that the details of what was played do not matter, but the memories of what was played do. Yet, is that achieving anything, except delving into memories of what was and reliving them once created? Is that a viable alternative to reobtaining the module, in this case, B2, Keep on the Borderlands, and simply replaying again? Will that not trigger those same memories with a playthrough decades since the last or first, along with new ones based upon the playthrough again of what was originally played, rather than what might just be an idea of it?

The What on the Border Where? is at best an interesting idea in memory recreation that is never really explored and is reductive is what it creates. At worst, it is a complete waste of time, one that adds nothing to B2, Keep on the Borderlands as a module and does not guarantee that Dungeon Master will have anything worth running at the end of it. Ultimately, it might just be simpler to order a copy of B2, Keep on the Borderlands and play that and so create new memories.

Friday, 31 December 2021

1981: X2 Castle Amber

1974 is an important year for the gaming hobby. It is the year that Dungeons & Dragons was introduced, the original RPG from which all other RPGs would ultimately be derived and the original RPG from which so many computer games would draw for their inspiration. It is fitting that the current owner of the game, Wizards of the Coast, released the new version, Dungeons & Dragons, Fifth Edition, in the year of the game’s fortieth anniversary. To celebrate this, Reviews from R’lyeh will be running a series of reviews from the hobby’s anniversary years, thus there will be reviews from 1974, from 1984, from 1994, and from 2004—the thirtieth, twentieth, and tenth anniversaries of the titles. These will be retrospectives, in each case an opportunity to re-appraise interesting titles and true classics decades on from the year of their original release.

—oOo—

Published in 1981, the second entry in the ‘X’ series of modules for Basic Dungeons & Dragons designed for use in conjunction Expert Dungeons & Dragons could not have been more different than the first. Both are pulpy in their tone and inspirations, but where X1 The Isle of Dread is a lush mashup of King Kong and Sir Arthur Conan-Doyle’s The Lost World with a dash of H.P. Lovecraft, X2 Castle Amber combines its Pulp sensibilities with a mixture of horror—the Gothic and the Lovecraftian in particular, sybaritic ennui, dreamlike dread, and woozy whimsey. The locations are different too, the Player Characters expected to sail to and explore a large island in search of treasure in X1 The Isle of Dread, whilst in X2 Castle Amber, they are unceremoniously pulled into an alternate dimension—not once, but twice—and forced to go looking for answers (and solutions) to their predicament, again not once, but twice. The bulk of X2 Castle Amber take place in a castle—or technically, it takes place in Château d’Amberville and is therefore not actually very castle-like—followed by a potentially lengthy wilderness section. In fact, having the scenario’s location before the wilderness section, when it is normally set after it in a traditional wilderness module, is very strange indeed, and that is in a very strange, often weird module indeed.

X2 Castle Amber is designed for a party of six to ten Player Characters, between Third and Sixth Level. The total of the party’s Experience Levels should be between twenty-six and thirty-four, ideally averaging thirty in total. Both X1 The Isle of Dread and X2 Castle Amber begin with the Player Characters on the Continent of the ‘Known World’. In X1 The Isle of Dread, they discover the journal describing a trip to the Thanegioth Archipelago, and lured by the mention of great treasure, sail off on the thousand-mile journey as soon as possible. In X2 Castle Amber, they are traveling to the Glantri City where they are hoping to find employment with one of the princes, but along the way, they get lost and are forced to make camp. After a sleep filled with nightmares, they awake to find themselves in the foyer of a mansion—a French mansion no less! With the mansion surrounded by a strange and very deadly mist, the Player Characters have no choice but to go forward and explore. In room after room, they will be confronted by one strange encounter after another—a nobleman who wants to set-up a bare-knuckle boxing match between his magen (or magical men) and whomever the party nominates as their champion, with bets on the outcome encouraged; a great banquet attended by ghosts which the Player Characters can also attend and eat their fill, and in doing so gain great benefits or dire consequences; a room with its floor covered in a Green Slime, ceiling in a Black Pudding, and its only furniture, a very full treasure chest, is covered in a Grey Ooze; an Ogre servant who killed his mistress and now dresses like her and attempts to emulate her; a river in an Indoor Forest crossed by a bridge under which lives a troll; a noblewoman buried accidentally alive in the chapel by her brother—in a very obvious nod to Edgar Allan Poe; a throne room populated by skeletons frozen in their last moments; and a mad, misshapen court jester with the power to charm others and turn them into white apes! And this is only the start.

X2 Castle Amber is home to the aristocratic Amber or D’Amberville family, and they are either incredibly bored or insane, often both. Their aim, when encountering the Player Characters is not necessarily to kill them, but toy with them and extract some entertainment value. This is not to say that Castle Amber is not deadly or that its inhabitants are all friendly—it is deadly in a great many places and many of the inhabitants are decidedly hostile. It is deadly—and weird—in another way too. There are multiple means of a Player Character dying simply by eating the wrong thing or making the wrong choice, notably at the banquet and later when picking cards from a tarot deck, and then failing a Saving Throw. However, death is not the only effect that a Player Character might suffer, such as having the spell Feeblemind cast on him or being turned into a ghost, and there are also many beneficial effects that a Player Character might gain. For example, he might gain a permanent increase in Hit Points or actual attributes or an increase by one Level upon the completion of his next adventure beyond that of Château d’Amberville. There is also quite a lot of treasure, both monetary and magical, to be found if the Player Characters are thorough and are prepared to brave the castle’s many dangers.

For the most part, X2 Castle Amber is fairly linear. The Player Characters start at the foyer of the castle and work their through the West Wing into the Indoor Forest and from there either into the East Wing or the Chapel. Although this is a mansion, it does not have a lived-in quality. It is all quite self-contained and all but frozen in time. This applies to many of the individual rooms and locations too, which often feel more like tableaus awaiting the arrival of the Player Characters and their involvement, the mix involving opportunities for roleplaying in interacting with the inhabitants and deduction in working out the tricks and traps to be found in the castle—as well as combat. This sense of the scenario being frozen in time applies to the Player Characters too, for at the end of each gaming session, they are encircled by a cloud of amber light, a space in which they are protected from the denizens of the castle, including wandering monsters, can recover Hit Points and spells, and even train to go up a Level if they have acquired enough Experience Points. This not only enhances the oddness of the Château d’Amberville, but it suggests a degree of agency upon the part of someone else… This though is only the first part of X2 Castle Amber.

Much of the first part of the scenario is presented as a mystery. Not so much a murder mystery—although that is sort of present in the scenario’s overall plot—but a mystery as what is going on and why the Player Characters have been pulled into the weird and whimsical world of Castle Amber. Plus of course, how they escape the castle and ultimately the grey mist. The scenario makes this relatively easy in placing a scroll in several places around the castle which gives explicit instructions as to the means of escape. This requires that the Player Characters locate several Silver Keys and then the Gate of the Silver Keys, which is located in the dungeons below Castle Amber, and from there travel to the original homeland of the D’Amberville family, Averoigne, and this is where the scenario opens up and again marks it out as something different to previous scenarios.

Averoigne is a mythical province of France and the setting of a series of short stories by Clark Ashton Smith which originally appeared in Weird Tales magazine. Used with permission, this marks X2 Castle Amber out as one of the first scenarios for Dungeons & Dragons to use licensed content and the module includes a list of all of the stories in its bibliography. Unlike in the castle, the Player Characters have far more freedom of movement in Averoigne—to an extent. No longer are they in a Dungeons & Dragons-style fantasy land, but an ahistorical fantasy land, one based on mediaeval France in which magic is outlawed by the church and the likelihood is that any demi-human Player Character is likely to be regarded as an abomination. So as much as they freedom of movement, they are constricted by the society of the land they are in. Like any good wilderness scenario, the Averoigne section of X2 Castle Amber is a sandbox which the Player Characters must explore driven by the need to locate the four items they need to unravel the final scenes of the scenario. So there is a need for subterfuge here unless the Player Characters want to become outlaws and fugitives.

However, advice and background for the Dungeon Master for this section of the scenario is perhaps a little underwritten. X2 Castle Amber is definitely not a sourcebook for Clark Ashton Smith’s Averoigne—though it could certainly form the basis of one—and so states that, “The encounters in this part of the module are left sketchy since most take place in cities and would require more detail and space than is available in this module. The DM should flesh out each adventure as he or she desires, designing NPCs, town streets and other details as necessary.” Potentially, this does leave the Dungeon Master with a lot of work to develop encounters and NPCs should her Player Characters deviate too much from the four quests to find the items necessary for them to progress onwards. At the very least, the Dungeon Master will need to improvise some of the encounters and NPCs outside of the scenario’s plot, and as a consequence, X2 Castle Amber is best run by an experienced Dungeon Master rather than one new to Dungeons & Dragons.

Lastly, the Player Characters can enter the scenario’s final dungeon, The Tomb of Stephen Amber. This is X2 Castle Amber at its mostly deadly, a complex of nine rooms, containing in turn, a Blue Dragon, a Flame Salamander, a Wyvern, a Stone Giant, a Manticore, a Mud Golem, a Great White Shark, and a five-headed Hydra, and that is in addition to dangerous environments in which these denizens reside. Now the Player Characters will not face all of these creatures, but they will face most of them, making for a tough physically challenging end to the module. If the Player Characters persevere and survive, they will encounter the NPC who has been sort of helping them along the way, be thanked, and richly rewarded for their efforts, including the resurrection four of their dead comrades—if they want. Surely, there can be no clearer indication of how tough a module if the Player Characters are being offered the chance of resurrection at the end?

Rounding out X2 Castle Amber is a bestiary of seventeen new—or mostly new—monsters. These include Amber Lotus Flowers, Giant Amoeba, Aranea, Brain Collector, Death Demon, Mud Golem, Grab Grass, Gremlin, Killer Trees, Lupin, Magen (of various types), Pagans, Phantoms, Rakasta, Slime Worm, Sun Brother, and Vampire Roses. Of these, the Aranea and the Rakasta originally appeared in X1 The Isle of Dread, and of the rest, the Pagans are worshippers of nature some of whom actually practice human sacrifice…! They can be found in the castle and in Averoigne, whilst some of the larger monsters are confined to the castle’s dungeon, including the Neh-Thalggu, or brain collector, and the Slime Worm.

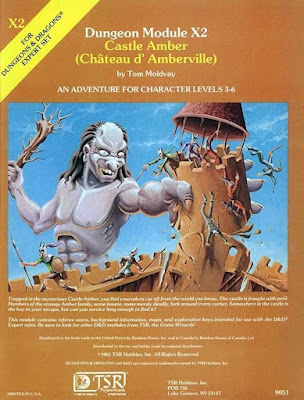
Physically, X2 Castle Amber is done in the traditional format for TSR, Inc.’s modules—a wraparound cover with maps on the inside, containing a plain black and white booklet inside. The Errol Otus cover depicting a giant wielding a tree trunk and grabbing a castle tower is excellent, but not necessarily appropriate to the events of the scenario. The internal illustrations, many of them done by Jim Holloway are superb, imparting both the horror and the humour of the module.

One interesting aspect of X2 Castle Amber is how in 1981 it prefigures I6 Ravenloft and Ravenloft itself as a campaign setting. Surrounded by a strange grey mist, Castle Amber is essentially a pocket dimension all of its very own—as is Averoigne in the later part of the module—and both would sit very easily on the Demiplane of Dread as Domains in their own right. Of course, the module is completely unconnected to Ravenloft for obvious reasons, but the similarities are there such that importing X2 Castle Amber into the Realm of Terror campaign setting for Advanced Dungeons & Dragons, Second Edition, without any difficulty at all. Further, given that both have the influence of Edgar Allan Poe in common, with some adjustment, X2 Castle Amber could also be adapted to be run as part of a Masque of the Red Death campaign as well.

As a complete scenario, X2 Castle Amber is principally a ‘funhouse’ dungeon, essentially a series of self-contained tests and challenges consisting of mostly puzzles and traps with little to any overarching plot or nod to consistency. Hence you have a weird room layered with puddings and oozes, and a ceiling with shafts that hide a myriad of traps. The effect initially then, is to confuse both Dungeon Master and then her players. First the Dungeon Master, because the module provides a sort of overview and of course, advises her to read the module through carefully, yet until she has actually done so, she will not really grasp what is going on and what the full plot is. This is because it is not effectively explained in the introduction to an infuriating degree, leaving it to the Dungeon Master to thoroughly read through the module to find out what is going on. Second for the players and their characters. They will have no idea what is going with the characters’ abduction and limited choice but to go forward and explore. Only once the Player Characters find the scroll they will at least have an objective and even then, there is the possibility that they will find the scroll, collect everything they need in Averoigne, do everything necessary to solve the mystery of how to leave Castle Amber, but never work out or learn what the overall plot is. However, by this point, the Dungeon Master will of course know what is going on.

The funhouse aspect of X2 Castle Amber also comes out in the humour, often dark humour, of the scenario. This includes squirrels with the Midas touch, the Jester with his White Ape companions, and Gremlins whose Chaotic area of effect will reflect spells, prevent mechanical effects from working, trousers to fall down, helmets to slip down over the eyes, and the like, all at their whim and amusement.

One issue with X2 Castle Amber which will require an experienced Game Master is the underwritten motivations of the NPCs, specifically the members of the D’Amberville family. Although the background to the Amber family is given and it is made clear that none of them is actually sane, ranging from slightly eccentric to completely insane, that they are Chaotic, uncooperative, bored, and looking for some diversion to relieve that boredom, individual motivations—apart from one or two—are sorely lacking. Which leaves the Dungeon Master with a lot of effort to put into the portrayal of these NPCs, many of them of high-Level Magic-users and Clerics beyond that possible in Basic Dungeons & Dragons and Expert Dungeons & Dragons at the time of the module’s publication.

—oOo—

X2 Castle Amber was reviewed by Jim in White Dwarf No 35 (November, 1982), who said, “Castle Amber is the second module for use with the Expert Set and is an attempt to bring randomness back into D&D. The 3rd and 6th level party become trapped in Castle Amber where they are beset by the members of the Amber family. Escape lies into a wilderness on another world where magic is frowned upon and spell casters may well come to the attention of the Inquisition. Non-humans are going to have a hard time here as they will be very conspicuous. Amber Castle depends a lot on chance leaving little room for skill and at times can be deadly.” His conclusion was that “I don’t recommend X2 unless you like chaotic adventures and designing urban areas.” and gave it a score of six out of ten.

More recently, X2 Castle Amber was included in ‘The 30 Greatest D&D Adventures of All Time’ in the ‘Dungeon Design Panel’ in Dungeon #116 (November 2004). Author of Return to the Keep on the Borderlands, John Rateliff said, “A rare example of a licensed product that shines both for its treatment of the original setting and for its excellence as a D&D adventure. Inspired by the ‘Averoigne’ stories of Clarke Ashton Smith, the best of the Weird Tales writers, it has a distinctive quirkiness, dangerous and sensuous and slightly amused all at the same time. There’s a reason it inspired not one but two sequels.”

—oOo—

By being set on an alternate plane of existence, X2 Castle Amber is very self-contained, which means that it is incredibly easy to adapt to other settings, whether that is as a Demiplane of Ravenloft or elsewhere. Yet initially, X2 Castle Amber feels incomprehensibly weird, leaving the Dungeon Master with little or no idea as to what exactly is going on, but give it the careful read through that every module demands—and is warranted here more than most—and the module’s weirdness and whimsy begins to come together. In places, underwritten and underdeveloped by modern standards though it is, X2 Castle Amber does have a coherency, eventually, that the archetypal ‘funhouse’ dungeon often lacks and the challenge perhaps lies in imparting that sense of coherency to the players. In addition to that, X2 Castle Amber does leave the Dungeon Master with a lot to develop to get the very most out of the adventure, whether that is fleshing out the motivations of individual D’Amberville family members or expanding upon the Averoigne wilderness section. The latter is arguably a not much more than a fascinating snapshot of the county which deserved further exploration which it never got in Dungeons & Dragons. It certainly would have made a fine addition to Ravenloft.

X2 Castle Amber is not perfect and it requires a lot of input upon the part of the Dungeon Master, but it is a fantastic Dungeons & Dragons adventure, made all the more enjoyable by its whimsy and weirdness, its humour and its horror. This with the combination of the Gothic and the Pulp Horror push it away from the classic medievalism of earlier modules into a much darker fantasy than that typically found in Dungeons & Dragons, and that is why X2 Castle Amber is regarded as a classic.

Sunday, 12 December 2021

1980: X1 The Isle of Dread

 1974 is an important year for the gaming hobby. It is the year that Dungeons & Dragons was introduced, the original RPG from which all other RPGs would ultimately be derived and the original RPG from which so many computer games would draw for their inspiration. It is fitting that the current owner of the game, Wizards of the Coast, released the new version, Dungeons & Dragons, Fifth Edition, in the year of the game’s fortieth anniversary. To celebrate this, Reviews from R’lyeh will be running a series of reviews from the hobby’s anniversary years, thus there will be reviews from 1974, from 1984, from 1994, and from 2004—the thirtieth, twentieth, and tenth anniversaries of the titles. These will be retrospectives, in each case an opportunity to re-appraise interesting titles and true classics decades on from the year of their original release.

—oOo—

In 1981, Basic Dungeons & Dragons moved out of the dungeon and up a Level. X1 The Isle of Dread was the first wilderness adventure for Basic Dungeons & Dragons, published the year before, and so focused on exploration across a wider geographical area—though not too wide—and discovering individual locations within that area. It was available separately, but was also packaged as the standard module for the Dungeons & Dragons Expert Set, which in addition to being designed to cover character Levels between three and seven, also focused on rules for wilderness travel, exploration, and encounters. If, due to their inclusion in the Basic Dungeons & Dragons boxed set, B1 In Search of the Unknown and B2 Keep on the Borderlands were a Dungeon Master and her players’ first experience of delving into dungeons and cave complexes, then X1 The Isle of Dread would be their first journey to a far off place in Dungeon & Dragons and their first taste of a world outside of the rock and stone walls underground…

X1 The Isle of Dread is designed for a large party of Player Characters, roughly between six and ten, who should be between Third and Sixth Level, averaging thirty Levels between them. The spur for their involvement in X1 The Isle of Dread will be the discovery of a sheaf of scrolls which are revealed to be letters and map describing an expedition by the pirate and explorer, Rory Barbarosa, to the Thanegioth Archipelago, a thousand-mile sea voyage south of the main continent. He relates how he and his crew reached one island with a small peninsula at its south western tip with access between the peninsula and the rest of the island to the north blacked by a massive stone wall. Standing before the wall is the village of Tanoroa, whose inhabitants stand guard on the wall against incursions and attacks from the creatures on what they call the ‘Isle of Dread’ to the north. Friendly and open to the possibility of trade, the inhabitants told Barbarosa that the wall was built by the gods who also built an ancient city in the Isle of Dread’s central highlands and that the inland city was rumoured to hold unimaginable treasures, including a great black pearl of ‘the gods’! Unfortunately storms and attacks by tribes of cannibals meant that Barbarosa was unable to explore the island fully and was planning an expedition when he died. Now of course, it is up to the Player Characters to hire a ship, set sail for the far islands, and explore them themselves, and perhaps make the discoveries that Rory Barbarosa was never able to!

Rather than leaving it there, X1 The Isle of Dread also includes several suggestions as to how the Player Characters might get involved rather than simply discovering Barbarosa’s letters and then get them to the island. These include being hired by a merchant to investigate and explore the island, purchasing an old ship and hoping that it can get them to the Thanegioth Archipelago, having a Player Character inherit a ship, or simply letting them borrow the money to purchase the ship. Whatever the option, the Player Characters set sail and make the week or more long journey south with the Dungeon Master rolling for encounters on the Ocean Sea Encounter Tables in the Dungeons & Dragons Expert Set and rolling for weather.

Landing on the island, most likely at the village of Tanoroa, the Player Characters will find the inhabitants friendly and helpful. Their society is an interesting mix of the South Seas and the Caribbean, each village being led by a matriarch who is advised by a male war chief and a Zombie Master, who raises the ‘Walking Ancestors’ as labourers and sometimes warriors. Whilst the villagers are welcoming and open to trade, they will not join the Player Characters on any expedition north of the wall, which means that unless they have brought hirelings with them, the Player Characters are very much of their own. Overall, the village of Tanoroa has a slightly creepy feel to it, what with the zombie work force and the question of just what the giant wall is protecting the village from. However, unless the Player Characters commit some faux pas, Tanoroa should serve as a safe base of operations from which they can mount their expeditions.

Beyond the wall itself is the ‘Isle of Dread’, a mix of jungle, low lying coastal swamps and swampy lakes, marked by mountains and the occasional volcano. Some twenty-four locations on and around the island, including the village of Tanorora, are described. They include sharks basking off beautiful beaches, camps of pirates, a deranged ankylosaurus (!), a sea dragon, and more. There are caves infested with troglodytes, rock baboons, ogres, and even a green dragon. Notably, all of these cave encounters use either one of the two cave maps provided, though the Dungeon Master would be free to design her own. There are encounters with new monsters too, such as the nomadic Rakasta, anthropomorphic felines which ride sabre-tooth tigers; the Phanaton, monkey-raccoon-like creatures which dwell in tree villages and can glide from tree to tree; and the Aranea, a large, pony-sized species of intelligent spider, capable of using magic. Some of the marked encounters are not pre-written, but left up to the Dungeon Master to roll on the three Wilderness Wandering Monster tables included with the scenario, this in addition to rolls she will be making regularly on the tables as the Player Characters explore the island.

Eventually, the Player Characters will reach the ancient city where the black pearl can be found. This is on an island—Taboo Island—in the middle of a lake in the crater of a hopefully extinct volcano which stands at the centre of a thirty-mile-wide plateau, some three thousand feet high. The plateau is so high it has its own climate—temperate rather than tropical of the rest of the Isle of Dread—and thus its own wandering monster table, which includes mastodons, pterodactyls, sabre-tooth tigers, and occasional tremor. Having gotten atop the plateau, it will take an eight-hour climb to get over the lip of the volcano on and descend to its base. Here the Player Characters will eventually be welcomed by villagers who live on the lakeshore and who are being attacked by head-hunters. In fact, they will be so welcoming that in return, they will want the Player Characters to deal with the rogue tribespeople.

Taboo Island turns out not to be so much an island, as a temple complex partially occupied by the head-hunters within the upper levels. This actually the nearest that X1 The Isle of Dread comes to including an actual dungeon. The highly detailed complex has three quite distinct and very different levels. The temple itself is ruin, occupied by the cannibals, whilst the second level is partially flooded and infested with traps, and the third consists of a cavern filled with steam and super-hot mud pools and the true villains of the scenario, the Kopru, evil amphibious, fluke-tailed humanoids with the ability to charm others into serving them. This is their first appearance in Dungeons & Dragons, as well as in X1 The Isle of Dread, and the Player Characters’ encounter with them is going to be made all the more challenging by the hot, hot steamy environment and the ability of the Kopru to charm the Player Characters into doing their bidding.

Rounding out X1 The Isle of Dread is half a dozen suggestions for further play on the Isle of Dread, including destroying a Zombie Master in Tanaroa after the village has been attacked by undead creatures, mapping the island, hunting for dinosaurs and harvesting their parts, exterminating the pirates, capturing animals and creatures to bring them back to the mainland, and searching for sunken treasure. These are all fun ideas and could easily be developed by the Dungeon Master. Lastly, there are stats for typical NPCs and write-ups of all of the new monsters given in X1 The Isle of Dread of which there are a lot.

In terms of advice for the Dungeon Master, as a training scenario for running a wilderness scenario, X1 The Isle of Dread is perhaps underwhelming, especially in comparison to the earlier, B1 In Search of the Unknown, which was specifically designed to help the novice Dungeon Master populate and design her first dungeon. Nevertheless, despite being short, the advice is to the point that, “The DM should be careful to give the player characters a reasonable chance for survival. The emphasis is on ‘reasonable.’ Try to be impartial and fair, but give the party the benefit of the doubt in conditions of extreme danger. However, sometimes the players insist on taking unreasonable risks; charging a tyrannosaur bare-handed, for example. If bravery turns to foolhardiness, the DM should make it clear that the characters will die unless the players act more intelligently.” What this makes clear to the Dungeon Master is that the environment of the Isle of the Dread is dangerous, potentially deadly to the Player Characters, especially given that some of the creatures—particularly the dinosaurs—they will encounter will have a high number of Hit Dice and lots of Hit Points. This is further emphasised with, “When describing monster encounters, the DM should rely not only on sight – there are four other senses – smell, sound, taste, and feelings of hot, cold, wet and so forth!” Also, the Dungeon Master should use this as, “…[A] good way to “signal” a party that an encounter may be too difficult for them to handle.” and lastly, “The DM should also try to avoid letting unplanned wandering monsters disrupt the balance of the adventure.”

Then, in addition to X1 The Isle of Dread being the first wilderness adventure for Basic Dungeons & Dragons and subsequently Expert Dungeons & Dragons, the module is interesting because it introduced the lands of the ‘Known World’, what would become Mystara, with a large map of an area identified as the ‘Continent’. Smaller maps of Karameikos and its wider environs would later be included in the Dungeons & Dragons Expert Set, but here there is a full and large-scale map of the Continent accompanied by thumbnail descriptions of its sixteen or so countries and regions and a pronunciation guide for each of their names. Many of these go on to be more fully detailed with a series of setting supplements for Advanced Dungeons & Dragons, Second Edition, but even here the descriptions capture the odd mix of cultures and geographies mashed together. Many of the cultures are based on Earth cultures, including Huns, Mongols, Icelanders, medieval Italy, Byzantium, and more, all alongside the fantasy elements of Dwarven and Elven kingdoms, magocracies, and Halfling shires. Further, these are all mixed and pushed together, so famously, the Vikings of the Nordic Soderfjord Jarls sit immediately to the north of the Arabic Emirate of Ylarum, a giant desert. Of course, it feels unrealistic, even nonsensical, but perhaps taken in the context of the Pulp sensibilities of X1 The Isle of Dread, that lack of realism will not be so much of an issue and can even be a feature.

Physically, X1 The Isle of Dread is really very well presented. The maps are excellent, whether wilderness or other location—and there are a lot of them. The map of Continent and its relationship to the Thanegioth Archipelago, as well as that of the Isle of Dread itself, are fantastic. The module is also well written and solidly supported with the new monsters, a rather plain handout of Barbarosa’s letter, and the outline of the Isle of Dread he mapped before he died.

—oOo— 
X1 The Isle of Dread was reviewed in The Space Gamer Number 38 (April 1981) by Aaron Allston. He laid out the groundwork for his capsule review with, “An introductory scenario must, first and foremost, be an enjoyable adventure. It must also provide a “working model,” so that beginning DMs can see how to construct and organize an adventure. And it must be easily read, that the novice referee not become lost and confused with travelling from Crypt 1 to Village 3.” He made clear that, “This adventure goes a long way towards accomplishing those goals. The scenario itself, set on an island whose simple human culture bears tinges of Polynesian and Amerind societies, is relatively tame, but provides some tense moments. Enough variable situations are presented to keep the whole thing from becoming static. More important, in this instance, is the module’s organization as a prototype. It does well here, too; almost all the maps can be removed and the appropriate text descriptions are clearly keyed to the proper maps. This scenario cannot be played cold, which is also a necessary experience for a novice DM; it must first by read through and assessed.” However, he was not wholly positive, adding, “No real problems evidence themselves. As noted, this adventure will not appeal to experienced players; there is a certain lack of color or sweep to the whole thing.” before concluding that the module was, “Recommended to beginners only – but it says so on the cover.”

Anders Swenson reviewed X1 The Isle of Dread in Different Worlds Issue 12 (July 1981). He liked the, “…[C]oncept, design, and execution of this dungeon module. There have been only a few campaign/adventure books among the scores of products published for the hobby, but this is one of the best yet available. The map is flexible in that many sorts of adventures could be worked into the terrain as it is shown. There are many different types and patterns of landforms depicted. Many of the encounters specified for the Isle of Dread could be dropped intact onto other parts of the map.”

More recently, X1 The Isle of Dread was included in ‘The 30 Greatest D&D Adventures of All Time’ in the ‘Dungeon Design Panel’ in Dungeon #116 (November 2004). The founder of GREYtalk, the World of GREYHAWK discussion list, Gary Holian, described it as, “The first true module to introduce players to a ‘wider world’ beyond the castle, forest, and cave, Dread tore them from their medieval moorings and sent them careening across the waves to collide with a prehistoric lost world.” Mike Mearls, Co-Lead Designer for Dungeons & Dragons, Fifth Edition, asked, “Who doesn’t like hopping on a longship and sailing for days across the open sea to battle dinosaurs, pirates, cannibals, and the horrid kopru? It’s hard to believe that all that material is crammed into 32 pages.”
—oOo—

X1 The Isle of Dread is a great set of tools to run a hex crawl wilderness campaign. With its new monsters and distance from the civilisations of the Continent, the Dungeon Master has the scope to just not run a very different kind of adventure, but also scope to develop areas of her own. After all, there are whole other islands in the Thanegioth Archipelago which are left devoid of detail in the module. Plus with its mix of Zombie Masters, dinosaurs, pirates, and strange mind-controlling amphibians, it has a lush, Pulp sensibility, taking in King Kong, The Lost World by Sir Arthur Conan-Doyle, and H.P. Lovecraft. And yet…

In so many places, X1 The Isle of Dread feels flat. To start with, whilst the hook of great treasure is enough to get the Player Characters to the Thanegioth Archipelago, it does not feel enough to quite keep them going. For example, there are no hooks or NPCs with motivations to be found at the village of Tanoroa, although the suggestions for further adventures on the Isle of Dread do suggest one. In addition, although there is a great wall across the narrow isthmus connecting the peninsula to the Isle of Dread, there is no mention of quite what the wall is guarding against. Given the Pulp sensibilities of the adventure and the wall’s obvious nod to King Kong, its very existence is begging for a night-time attack against it to be staged by some great beast. Then there is Taboo Island, barely described bar the old temple, which as dungeon complex is open to expansion, but incredibly difficult to traverse from one level to the next such that the Player Characters may never discover the true secrets of the island. The fact that the Player Characters may never discover the true secrets of the island is the ultimate problem with X1 The Isle of Dread.

X1 The Isle of Dread does not really explain what the true secrets of the Isle of Dread are until two thirds of the way through the module. This is that the Kopru once controlled a great empire which spanned the whole of the Thanegioth Archipelago, thriving in the islands’ hot geysers and mud springs and enslaving native human population with their mind-controlling powers. The temple on Taboo Island was where they were worshipped as gods, but eventually they were overthrown. This is why the villagers on the peninsula fear the Isle of Dread, but cannot say why. Yet there is no sign of the Kopru on the Isle of Dread or any of the encounters on the island, until the Player Characters descend into the temple on Taboo Island—no ruins or hints, or even indications that Koru have charmed anyone on the island and so might be in their service. Literally, the Kopru are simply locked away until the Player Characters arrive and that is a huge, missed opportunity in terms of storytelling to the point where even if the Player Characters do encounter them, they may not realise the true nature of the Kopru and their secrets.

Ultimately, X1 The Isle of Dread needs the Dungeon Master to really work at it to drop some hints and develop some hooks which will draw her players and their characters into wanting to explore more, and it fails to really help the Dungeon Master do that when it really should. However, as a first wilderness module, X1 The Isle of Dread is a fantastically pulpy, fun hex-crawl, rife with potential for some great adventures and stories.

Saturday, 29 August 2020

[Fanzine Focus XXI] Wormskin Issue Number 8

On the tail of the Old School Renaissance has come another movement—the rise of the fanzine. Although the fanzine—a nonprofessional and nonofficial publication produced by fans of a particular cultural phenomenon, got its start in Science Fiction fandom, in the gaming hobby it first started with Chess and Diplomacy fanzines before finding fertile ground in the roleplaying hobby in the 1970s. Here these amateurish publications allowed the hobby a public space for two things. First, they were somewhere that the hobby could voice opinions and ideas that lay outside those of a game’s publisher. Second, in the Golden Age of roleplaying when the Dungeon Masters were expected to create their own settings and adventures, they also provided a rough and ready source of support for the game of your choice. Many also served as vehicles for the fanzine editor’s house campaign and thus they showed another DM and group played said game. This would often change over time if a fanzine accepted submissions. Initially, fanzines were primarily dedicated to the big three RPGs of the 1970s—Dungeons & Dragons, RuneQuest, and Traveller—but fanzines have appeared dedicated to other RPGs since, some of which helped keep a game popular in the face of no official support.

Since 2008 with the publication of Fight On #1, the Old School Renaissance has had its own fanzines. The advantage of the Old School Renaissance is that the various Retroclones draw from the same source and thus one Dungeons & Dragons-style RPG is compatible with another. This means that the contents of one fanzine will compatible with the Retroclone that you already run and play even if not specifically written for it. Labyrinth Lord and Lamentations of the Flame Princess Weird Fantasy Roleplay have proved to be popular choices to base fanzines around, as has Swords & Wizardry.


The Wormskin fanzine, published by Necrotic Gnome is written for use with Labyrinth Lord and issue by issue, details an area known as Dolmenwood, a mythical wood, an ancient place of tall trees and thick soil, rich in fungi and festooned with moss and brambles and rife with dark whimsy. Wormskin No. 1 was published in December, 2015, and was followed by Wormskin No. 2 in March, 2016. Both issues introduced the setting with a set of articles rich in flavour and atmosphere, but lacking a certain focus in that the region itself, Dolmenwood, was not detailed. Fortunately, in March, 2017, Necrotic Gnome Productions released Welcome to Dolmenwood, a free introduction to the setting. Further, Wormskin No. 3 and Wormskin No. 4, published in July, 2016 and Winter 2016 respectively, improved hugely upon the first and second issues, together providing a better introduction to Dolmenwood, giving some excellent answers to some very good questions about the setting before delving into what is the biggest secret of Dolmenwood. Published in the winter of 2017, Wormskin No. 5 looked at how the region might be explored, whilst also presenting the region around ‘Hag’s Addle’. Wormskin No. 6 focused on the area around Prigwort, as well as detailing ‘The Fairy Lords of Dolmenwood’ and the ‘Unseasons’ that beset the region, whilst Wormskin No. 7, published in 
the autumn of 2017, added both personal names and honourifics to Dolmenwood as well detailing further hexes under the eaves of the extensive forest.

Wormskin Issue Number 8 was published in February 2018, and exposed further secrets of Dolmenwood, presented a further guide to travelling in the region, and added further monsters. It feels like a relatively short issue, just containing four, reasonably lengthy articles, but all four do add to the setting. The issue opens with ‘The Sisters of the Chalice and the Moon’, an examination of witches and the witch cults to be found in Dolmenwood. The witches of Dolmenwood worship and become companions, guardians, and wives to otherworldly wood-gods known as Gwyrigons, and are highly secretive about their beliefs and practices. Their tenets are given as well as their initiation rites, how they live, their powers and abilities, schemes and goals, rumours about them, and their relationship with the factions also in the region. So they are cast spells like Magic-Users, gain certain powers from the Wood-gods—these are detailed in Wormskin Issue Number 7, can craft potions, talismans, and charms, and so on. For the most part, these are fairly typical abilities accorded witches, and since no mechanical details are given, the Game Master could easily refer to The Craft of the Wise: The Pagan Witch Tradition for the game stats. The relationships with other factions is just as useful, such as the Elf Lords’ view that the witches’ communion with the daemon nobles of the Otherworlds as discourteous, treacherous, and disgusting, whilst the witches claim fairies to be selfish and false; that the Duchy of Brackenwold and Barony of the High Wold tend to pointedly ignore the witches—since some of their family members might actually be witches, whilst the witches see both as ephemeral and irrelevant; and the witches seeing adventurers as useful when they need a task done that they themselves cannot do. Overall, it is good to a faction like the witches covered in such detail, and for the most part they are going to remain as NPCs, so the Game Master will need to provide the mechanics and rules herself should one of her players want a witch character.

In the course of eight issues, Wormskin has described a lot of the hexes, roads, and locations in Dolmenwood and since the region is quite a wide area, the Player Characters are going to be doing a lot of travel throughout the wood. Which also means that they are going to be staying out in the forest overnight on a regular basis. This is where ‘Camping in Dolmenwood’ comes into play, which provides rules and guidelines and charts for camping wild in the woods. This covers finding a suitable campsite, setting it up—fetching firewood, building a fire, fining water, foraging, hunting, and more, activities they might undertake during the evening, setting watches, and sleep. It all looks a bit mechanical, but with the roll of a few dice—including a thirty-sided die to determine a particular campsite and its features—a Game Master and her players can determine where and how well the Player Characters are camping, and from that derive a bit of roleplaying and party interplay. How often a Game Master wants to use these rules depends how much she wants to make travel a strong feature of her campaign (for example, it is a strong feature of The One Ring: Adventures Over The Edge Of The Wild), but can also be used to reinforce the fact that Dolmenwood does not being weird and eerie when the Player Character beds down for the night.

‘Strange Waters’ lists thirty different types and forms of water, their appearance, taste, and effect if consumed to be found in Dolmenwood—whether at the end of the day when setting up a campsite. For example, a shallow, muddy pool decorated by lilies and inhabited by amphibians whose surface is a perfect mirror and which tastes perfumed, but if drunk, instils an insatiably lascivious urge to remove your clothing! With thirty options for each element, the Game Master can use this table to make some of the waters to be found in the forest weird and hint at some the magics which run through them.

Rounding out Wormskin Issue Number 8 is more ‘Monsters of the Wood’. This entry in the department has a mycological theme with the inclusion of the Brainconk, Jack-o’-Lantern, Ochre Slime-Hulk, Pook Morel, and Wronguncle. These are all predatory fungi, some even sentient, such as carnivorous Brainconk which creep down from their current treetop homes to latch onto sleeping victims and slurp out their brains, and Pook Morels, which are tiny, but which project psychic horrors upon their victims who drop their possessions. These the Pook Morels scoop up and scamper back to their lairs to hide! All five of these fungi are accompanied by superb illustrations which will be sure to highlight their creepiness when shown to the players.

Physically, Wormskin Issue Number 8 is as well presented as previous issues. It is well written and cleanly and simply laid out. The artwork is good too, a mix of colour and black and white, which captures the weird and dreamy feel of Dolmenwood.

Of course, if you have previous issues of Wormskin, then Wormskin Issue Number 8 is absolutely worth adding—a major faction, something to engage the players and their characters with, a little of the weirdness to be region’s waters—literally, and new monsters. There is a nice sense of scale to the issue too, moving from the overview of the witches and their place in Dolmenwood, then getting smaller and smaller down to the mycology.


Sadly, Wormskin Issue Number 8 is the last issue. This is not as bad as it sounds, since Necrotic Gnome is planning to create a definitive Dolmenwood supplement, one which would best showcase the setting’s promise first hinted at with Wormskin Issue Number 1. Looking back at the eight issues, the ultimate problem with them is their ‘partwork’ structure, resulting in an incoherent feel. It meant that there would be several issues before there was a real introduction to the setting and articles which asked the most basic of questions about the region. What it felt like was needed is to take all eight issues and then split their articles up and assemble in some sort of order. With any luck, the forthcoming Dolmenwood setting supplement will address these issues, for the Wormskin fanzine has never been without flavour or atmosphere, just organisation.

Saturday, 23 May 2020

[Fanzine Focus XX] Wormskin No. 7

On the tail of Old School Renaissance has come another movement—the rise of the fanzine. Although the fanzine—a nonprofessional and nonofficial publication produced by fans of a particular cultural phenomenon, got its start in Science Fiction fandom, in the gaming hobby it first started with Chess and Diplomacy fanzines before finding fertile ground in the roleplaying hobby in the 1970s. Here these amateurish publications allowed the hobby a public space for two things. First, they were somewhere that the hobby could voice opinions and ideas that lay outside those of a game’s publisher. Second, in the Golden Age of roleplaying when the Dungeon Masters were expected to create their own settings and adventures, they also provided a rough and ready source of support for the game of your choice. Many also served as vehicles for the fanzine editor’s house campaign and thus they showed another Dungeon Master and group played said game. This would often change over time if a fanzine accepted submissions. Initially, fanzines were primarily dedicated to the big three RPGs of the 1970s—Dungeons & DragonsRuneQuest, and Traveller—but fanzines have appeared dedicated to other RPGs since, some of which helped keep a game popular in the face of no official support.

Since 2008 with the publication of Fight On #1, the Old School Renaissance has had its own fanzines. The advantage of the Old School Renaissance is that the various Retroclones draw from the same source and thus one Dungeons & Dragons-style RPG is compatible with another. This means that the contents of one fanzine will compatible with the Retroclone that you already run and play even if not specifically written for it. Labyrinth Lord and Lamentations of the Flame Princess Weird Fantasy Roleplay have proved to be popular choices to base fanzines around, as has Swords & Wizardry.

The Wormskin fanzine, published by Necrotic Gnome is written for use with Labyrinth Lord and issue by issue, details an area known as Dolmenwood, a mythical wood, an ancient place of tall trees and thick soil, rich in fungi and festooned with moss and brambles and rife with dark whimsy. Wormskin No. 1 was published in December, 2015, and was followed by Wormskin No. 2 in March, 2016. Both issues introduced the setting with a set of articles rich in flavour and atmosphere, but lacking a certain focus in that the region itself, Dolmenwood, was not detailed. Fortunately, in March, 2017, Necrotic Gnome Productions released Welcome to Dolmenwood, a free introduction to the setting. Further, Wormskin No. 3 and Wormskin No. 4, published in July, 2016 and Winter 2016 respectively, improved hugely upon the first and second issues, together providing a better introduction to Dolmenwood, giving some excellent answers to some very good questions about the setting before delving into what is the biggest secret of Dolmenwood. Published in the winter of 2017, Wormskin No. 5 looked at how the region might be explored, whilst also presenting the region around ‘Hag’s Addle’. Wormskin No. 6 focused on the area around Prigwort, as well as detailing ‘The Fairy Lords of Dolmenwood’ and the ‘Unseasons’ that beset the region.

Wormskin No. 7 was published in the autumn of 2017. The issue opens with two almost mundane, but actually very useful articles. The first, ‘Common Names in Dolmenwood’ lists thirty names each for men and women, Elves, Moss Dwarfs, Woodgrues, and Grimalkin—all given as Classes in earlier editions of the fanzine, plus liturgical names for Clerics, and then Honourifics for Clerics, Fighters, Thieves, and Magic-Users. The second, ‘Henchmen of Dolmenwood’ gives rules for locating and creating henchmen and then equipping them according to Class and Race. These obviously work together, but whether in combination or apart, they fill another part of Dolmenwood’s jigsaw puzzle. Especially the ‘Common Names in Dolmenwood’ which allows the Referee to easily name common NPCs.

The bulk of the issue though is dedicated to detailing another twenty-one hexes of Dolmenwood. These include seven hexes in the north around the hamlet of Drigbolton, seven hexes in central Dolmenwood to the east of the town of Prigwort, and in the south, seven hexes around the road from Lankshorn to Dreg. So ‘Drigbolton and Surrounds’ opens with the description of ‘The Hall of the Formorian’, a domed hall atop a marble slab which is home to a blue-skinned immortal giant bound by duty to await the arrival of an unknown man named Jack, a cottage of full of ghosts ready to trade secrets, whilst near the ghost town of Midgewarrow lies the manor home Lady Mariejay Haeroth, local noble and reclusive witch. The town of Drigbolton is mentioned, but not detailed, a full description being given in the scenario, The Weird that Befell Drigbolton.

Near Prigwort is the Ravine of the Stag Lord, a lonely natural amphitheatre where the Stag Lord manifests from the Otherworld to receive homage, though sadly without his head which has been stolen! What boons might he and his stag allies bestow should someone return the lost head to him? South of the ravine on the road is the Refuge of St. Keye, a stopping point on the old pilgrimage to the abandoned Abbey of St. Clewd. Here travellers can find a night’s rest and food if they are willing to listen to a sermon or two. Before that stands the Wenchgate—from the local name for Dryads, an arch of living trees and branches carved with faces that said to welcome travellers to Dolmenwood. Northeast of Lankshorn, not far from the Ditchway is a curiously formed hillock, which will radiate strongly should any magic that detects undead be cast upon it. This is because it is actually the skull of giant of a prodigious size no longer seen in these ages. With a skull that big, what could be inside it? Travellers looking for entertainment might want to visit the Port of Dreg and Shantywood Isle, the former a seedy haunt of thieves, smugglers, charlatans, and more, the latter a cliff-sided island upon which sits Chateau Shantywood. This is a ‘manor of ill repute’, but one which is an independent state of its own! The owner, Madame Shantywood is as much a repository of rumours and pillowtalk as she is ambitious to increase her influence.

The last part of Wormskin Issue Number 7 is devoted to ‘Monsters of Dolmenwood’. This presents some nine creatures native to the Eldritch region. The format for the monster entries has been shortened into a more concise fashion by excising the lair and encounter details which were included in previous entries in the series. This is disappointing because these added detail and examples which made the monster entries easier for use by the Referee. Nevertheless, these are good monsters, many of which have appeared in this and previous issues of the fanzine, either as known denizens of Dolmenwood or as playable character types and Races. They include the Drunewife, the womenfolk of the Drune known for their enchanting songs, and their herbalism and pottery, who are often accompanied by Kilnlings, the clay figurines that serve them. The Giant Psionic Snails are gargantuan denizens of the Otherworld who feed on the energy of Dolmenwood’s Ley Lines, who are often sort out for their knowledge of the Otherworld. One is thought to reside near Lankshorn, where its thoughts manifest as a tea tent that serves the mostly refreshing of brews.

Physically, Wormskin Issue Number 7 is as well presented as previous issues. The layout is clean and unfussy, the tables of ‘Common Names in Dolmenwood’ and ‘Henchmen of Dolmenwood’ make subtle use of colour and are so easy to read. As per usual, the issue uses a mix of publicly available artwork and commissioned pieces, the latter capturing the quirky nature of Dolmenwood. The issue’s use of colour is judicious and so stands out where it appears.

Wormskin Issue Number 7 is a solid issue, detailing yet more of Dolmenwood’s weird locations and inhabitants. Of course the issue suffers from the ‘Part Work’ format of Wormskin so putting it all together is all a bit daunting. It gives Dolmenwood a patchwork feel, the issue lending itself more to parts which a Referee can pull out and add to her game rather than Dolmenwood. 

Monday, 18 May 2020

Beyond the Moldvay Way

In a recent conversation on Twitter, a poster asked the question, “What’s a good retroclone based on Advanced Dungeons & Dragons?” Various answers were given, most notably OSRIC™ System (Old School Reference and Index Compilation) and Astonishing Swordsmen & Sorcerers of Hyperborea: A Roleplaying Game of Swords, Sorcery, and Weird Fantasy. My response was that in most cases, retroclones start with a version of Dungeons & Dragons or Basic Dungeons & Dragons and then build up from there to emulate Advanced Dungeons & Dragons. Certainly, this is the case with Labyrinth Lord and Advanced Labyrinth Lord. It is also the case with Old School Essentials: Classic Fantasy, Necrotic Gnome’s interpretation and redesign of the 1981 revision of Basic Dungeons & Dragons by Tom Moldvay and its accompanying Expert Set by Dave Cook and Steve Marsh. With Old School Essentials: Advanced Fantasy presents options which emulate Advanced Dungeons & Dragons whilst restraining them in order to avoid the complexities of Advanced Dungeons & Dragons.


Old School Essentials: Advanced Fantasy actually consists of two separate books. These are Old School Essentials Advanced Fantasy: Genre Rules and Old School Essentials Advanced Fantasy: Druid and Illusionist Spells. Now the two books complement each other, but also work on their own—though only to an extent. This is because some of the Classes from Old School Essentials Advanced Fantasy: Genre Rules use some of the spells from Old School Essentials Advanced Fantasy: Druid and Illusionist Spells, but simply the Magic-User from Old School Essentials: Classic Fantasy could use the Illusionist spells from Old School Essentials Advanced Fantasy: Druid and Illusionist Spells and a game of Old School Essentials using Old School Essentials Advanced Fantasy: Genre Rules could be run without using the spells from Old School Essentials Advanced Fantasy: Druid and Illusionist Spells or without using the Classes that use those spells. However, Old School Essentials Advanced Fantasy: Genre Rules and Old School Essentials Advanced Fantasy: Druid and Illusionist Spells really work together and ideally the Referee should combine both if she wants to run Old School Essentials Advanced Fantasy.

Old School Essentials Advanced Fantasy: Genre Rules provides Referee and her players with some fifteen new Classes. In keeping with Old School Essentials, nine of these Classes are Human-only Classes. These are Acrobat, Assassin, Barbarian, Bard, Druid, Illusionist, Knight, Paladin, and Ranger. What is interesting here is the inspiration for these Classes. Not just Advanced Dungeons & Dragons, First Edition, but with the inclusion of the Acrobat, Barbarian, and Knight—as nods to the Thief-Acrobat, Barbarian, and Cavalier respectively—Old School Essentials Advanced Fantasy: Genre Rules actually draws upon that most contentious of supplements for Advanced Dungeons & Dragons, that is, Unearthed Arcana. The other six Classes are Demihuman Classes and in keeping with Old School Essentials Advanced Fantasy with ‘Race as Class’ rather than Player Characters possessing both Race and Class. The six are Drow, Duergar, Gnome, Half-Elf, Half-Orc, and Svirfneblin, and again, in bringing these to Old School Essentials, the supplement draws heavily upon the Unearthed Urcana. The inclusion of the Drow, Duergar, and Svirfneblin also draws from the Underworld of Dungeons & Dragons-style roleplaying games, which Old Old School Essentials Advanced Fantasy: Genre Rules also add to Old School Essentials as an adventuring environment. What is clearly missing from these fifteen new Classes is the inclusion of the Monk as a new Class, but the publisher aims to include that in a supplement to mythical Asian adventures, what will likely be the equivalent of Oriental Adventures for Old School Essentials.

For the most part, the Classes in Old School Essentials Advanced Fantasy: Genre Rules will be familiar. So the Acrobat and the Assassin are like the Thief Class, but lack skills such as Pick Pocket, Find Trap, and so on. Instead, the Acrobat focuses on jumping, tumbling, and evading, whilst the Assassin focusses on kills by stealth. Similarly, the Barbarian has some stealth skills in the wilderness, fears all use of magic, and can eventually strike otherwise invulnerable foes. The Knight adheres to a chivalric code, always attempts to wear the best armour and wield the best weapons, is a good horseman, and is immune to fear. The Paladin casts divine magic, can lay on hands to heal and turn or destroy undead. The Ranger is rarely surprised, casts Druidic spells, can track, and also perform surprise attacks in the wilderness. The Bard is different in that it can cast Druidic spells from the Old School Essentials Advanced Fantasy: Druid and Illusionist Spells, charm and fascinate an audience with his music and singing and learns languages and lore. Druids are of Neutral Alignment, also cast Druidic spells, can Pass Without Trace in the wilderness, rarely get lost in the woods, and can eventually shape change into animals. The Illusionist is like the Magic-User, but casts spells from Old School Essentials Advanced Fantasy: Druid and Illusionist Spells.

Of the six ‘Race as Class’ Classes, the Drow are like Elves, but know Divine rather than Arcane spells, suffer light sensitivity, and have an affinity for spiders. Duergar are like Dwarves, but suffer from light insensitivity and notably have mental powers like Invisibility and Enlargement that can be used daily. Gnomes cast Illusionist spells, but can wear armour and also speak with burrowing animals. Half-Elves can all use all weapons and armour and can also cast arcane spells, though not as many as an Elf or a Magic-User. The Half-Orc can use all weapons and light armour and has a number of Thief skills, whilst the Svifneblin can blend into stone, has illusion resistance, can speak with Earth Elementals, can understand the murmurs of stone, and also suffer from light sensitivity.

What is notable with all of these Classes is that the designer has tried to keep them unique, to keep their abilities from encroaching on those of Classes, and to keep them from being too powerful. The likelihood is that he has almost succeeded with the fifteen new Classes. There is some overlap of skills, for example, the Move Silently skill being shared by several different Classes. Plus Classes like the Knight and the Paladin do feel powerful in comparison to the standard Classes. That said, all of the Classes feel reined in when comparing them to their original versions from Advanced Dungeons & Dragons.

In addition to the supplement’s dozen or so Classes, Old School Essentials Advanced Fantasy: Genre Rules also provides a number of Advanced Character Options. These include rules for making Old School Essentials a Race and Class roleplaying game, separating the two. So all three ‘Race as Class’ Classes from Old School Essentials— Dwarf, Elf, and Halfling—as well as Humans are presented as Races, as are the Drow, Duergar, Gnome, Half-Elf, Half-Orc, and Svirfneblin. All bar Humans have Level limits on the Classes available to them, though if this is lifted, options are given to account for the lack of Human innate abilities. Further rules cover the use of poison, extra rules for combat including two-weapon fighting and parrying, multi-classing, as well as secondary skills and weapon proficiencies. Of course these add complexity in play, but they also add depth and they move Old School Essentials towards, but not to the level of complexities of Advanced Dungeons & Dragons. And again, these rules are all optional.


Old School Essentials Advanced Fantasy: Druid and Illusionist Spells is the companion volume and very much contains what it says on the tin. It presents thirty-four Druid spells, from First to Fifth Level, and seventy-two Illusionist spells, from First to Sixth Level. Druid spells focus on survival, healing, and offence, so Predict Weather, Cure Light Wounds, and Call Lightning. Illusion spells focus on deception, mind control, and warping reality, so Dancing Lights, Fascinate, and Mirror Image. The selection and range have been kept in line with the Cleric and Magic-User spells of Old School Essentials, so the numbers for the Druid are the same as the Cleric, just as the numbers for the Illusionist are the same as the Magic-User. What is fantastic about Old School Essentials Advanced Fantasy: Druid and Illusionist Spells is how well the book is organised. It has an index for the spells plus the inside of the front and back covers are effectively used, not just with spell lists, but spot rules too. It makes Old School Essentials Advanced Fantasy: Druid and Illusionist Spells highly accessible and useable at the table.

Physically, both Old School Essentials Advanced Fantasy: Genre Rules and Old School Essentials Advanced Fantasy: Druid and Illusionist Spells are nattily presented little hardbacks. In particular, Old School Essentials Advanced Fantasy: Genre Rules follows the format of Old School Essentials by keeping its various elements particularly succinct. So every Class is kept to a single two-page spread, each individual Race to a single page, and so on. Both books are illustrated in black and white and for the most part, the artwork is good.

If there is an issue with Old School Essentials Advanced Fantasy: Genre Rules and Old School Essentials Advanced Fantasy: Druid and Illusionist Spells it is really that not all of either book works without referring to the other. If the Druid and Illusionist Classes are in play, then really, Old School Essentials Advanced Fantasy: Druid and Illusionist Spells is really necessary to effectively play because not only the Druid and Illusionist use these spells, but so do the Bard, the Gnome, and the Ranger. If there is another issue with either book, it is that they pull Old School Essentials away from its origins in the 1981 revision of Basic Dungeons & Dragons and its accompanying Expert Set. The inclusion of elements from Advanced Dungeons & Dragons may not sit well with some players and Referees of Old School Essentials, but fundamentally, both Old School Essentials Advanced Fantasy: Genre Rules and Old School Essentials Advanced Fantasy: Druid and Illusionist Spells are optional. Which means that they are not integral to playing or running Old School Essentials and neither Referee nor player have to purchase them to play the roleplaying game.

Ultimately, if you are playing Old School Essentials using Old School Essentials Advanced Fantasy: Genre Rules and Old School Essentials Advanced Fantasy: Druid and Illusionist Spells, then you are not playing the Basic Dungeons & Dragons of 1981. However, neither are you playing Advanced Dungeons & Dragons. Instead, Old School Essentials using Old School Essentials Advanced Fantasy: Genre Rules and Old School Essentials Advanced Fantasy: Druid and Illusionist Spells presents the means to incorporate elements of Advanced Dungeons & Dragons, but in a restrained fashion, adhering to the simplicity of Old School Essentials throughout.